Onam is celebrated by Keralites irrespective of their religion, culture etc; Onam brings very fond memories to all malayalees and it’s same with me.
If you want to experience the spirit of Onam, you should visit the DH (Darbar Hall) Road in Cochin during Onam. The entire road is filled with the sound of street vendors competing with each other, the aroma of freshly fried banana chips, the fragrance of flowers, the laughter of families enjoying their Onam shopping and what not. You just have to stand at the entrance of the road and the crowd will push you to your destination :-)
My Onam memories would be incomplete if I didn’t mention my visits with friends, to the Onam fair. We had a tuition class at a tutorial just in front of the DH Road and we used to skip it frequently. Come Onam and we were regular students. We’d be just waiting for the class to get over, so that we could go and hang out at the fair and payasam melas. Am sure every Malayali will have their own share of ‘sweet’ memories like these.
Now back to our topic, the star attraction of the Onasadaya, payasam. I guess you can divide payasam lovers broadly into two categories – those who love pal payasam (milk and sugar based) and those who love sharkkara payasam (jaggery & coconut milk based). I fall in the latter.
Though I’ve made a full fledged Onasadaya only once after my wedding, I never compromised on payasams. Since my husband and myself fall into two different categories, I make both pal payasam and parippu payasam. Semiya payasam is his favorite and I should say its the simplest of all.
If you don’t have much time to spare in the kitchen and still want to grab the festive mood of Onam, you can go for this easy and delicious treat :-)
Recipe type: Dessert – Indian traditional sweets and dessert
Cuisine: Indian
Ingredients
Vermicelli/semiya – 200gm
Milk – 2 ltrs
Condensed milk – 1 tin
Sugar – 5tbsp
Cashew nuts & raisins – ½ cup each
Cardamom – 2 big, crushed
Ghee/clarified butter – 2½ tbsp
Instructions
Heat 2 tbsp ghee in a bottom heavy pan and roast the semiya till golden brown. Add milk to it and cook on low flame till semiya is fully done. Keep stirring in between. Add condensed milk and sugar and stir, till it is well combined with milk. Add crushed cardamom and remove from fire.
Heat ½ tbsp ghee in a pan and fry the cashew nuts, when it becomes golden brown, add raisins. Add the fried cashews and raisins to payasam. Serve hot or chilled.
Notes
Since one tin condensed milk is used, this payasam is rich and has a creamy texture.If you prefer less creamier payasam substitute condensed milk with 2 cups sugar.
Adjust the quantity of sugar and condensed milk to suit your taste. The quantity prescribed above gives a medium-high sweetened payasam.
I used Al Marai full fat milk to make this payasam.
Now where should I start, hhmm.. am clueless. It was exactly like this 3 years back, when I started this small space of mine called MariasMenu. Yes, MariasMenu is celebrating its 3rd birthday this month!! I never thought this space would come this far, I’ve never worked in a place for 3 years, so this is something great for me. At least I can now say that I’ve one hobby that lasted/lasts for sometime :)
If you’re interested in history, please read on or else jump straight to the recipe, wait…there is something for you at the end. As I’ve said before I was clueless when I started this. I didn’t even know what a blog was. I was told by my computer guru (read my husband Jose), its an online diary and you can write your recipes there instead of a book. I thought ok, not bad. So I started writing recipes in this diary. That’s how it all started. I am very much embarrassed to say this ….when I started the blog I didn’t even know there were other food blogs!! (how was I supposed to know that others were also writing recipes like this!!)
Didn’t I tell you before, I was stuck at the Charles Babbage era of computers? It took me sometime to get used to this “blogging” thing :). If you check the earliest recipes, you can see that there are no pictures and the reason…how many of you put pictures in your recipe diary?? I don’t. So after the “blogging” thing got into my head, pictures started appearing here :). For that I’d like to thank my in laws, because they are the ones who gave me the idea of putting snaps here. Btw, have I told you, that before if somebody used to ask me to take photo I used to flee and now because of blogging I at least know how to switch on & off a camera ;)
Blogging has helped me in many ways and I don’t have any regrets. This introduced me to many people from different parts of the world, helped me to understand different types of cuisines, encouraged me to read more about cooking, try out new recipes regularly etc etc; All this happened primarily because of my husband, Jose. Thank you my dearest :). How can I repay you, hhmm may be I will let you do a guest post here ;). I would also like to thank my family (who don’t believe in my cooking skills yet and think that I’ve cut and paste all these snaps from somewhere else…just my luck!), thank all my friends, including my blogging friends who take time to leave sweet comments here and encourage me to continue with this.
If you’ve noticed I’ve started posting more regularly from last year onwards. For that am ever grateful to my dearest cousin sis Ammu. After she started cooking, she used to give constant feedback about the recipes, how I write them, about the snaps etc; Her feedback was a great motivation for me, thank you my dearest sis :). Another person I would like to thank is another cousin sis of mine, am sure most of you know her, yes you guessed it right, its Annita :). I think the existence of my blog was known to the world, only after she linked to me. Dear Annita, thank you for your support and encouragement.
Ok, please dont feel bad, I havent forgotten you, how can I??. After all, you are the ultimate motivator for me. If you weren’t interested in turning the pages of my online diary, MariasMenu, again n again, I wouldn’t have written for the past 3 years. I would have stopped it long back. Thanks a ton for all your comments and sharing your happiness with me. Please do continue to drop in here and share your thoughts, comments, suggestions and happiness.
Here’s something for you: As part of our b’day celebration, we decided to give away a surprise gift. You dont have to do any cooking or take snaps, just answer a simple question. The winner will get a small gift coupon from Amazon.com
The question is: How many dishes in MariasMenu has the word “Malabar” in its title?
You can give your answers through the comment form. The last day for giving the answer is July 6th. General comments will be published, but your comments with the answer for this question will be published only after July 6th & the winner will be announced in the next post. If more than one person gets the correct answer, the winner will be decided by a lucky draw.
Update: Please try to post your answers through the comment form itself instead of sending it as a mail.
Btw, one more thing before I go to the recipe. I wanted to bake a cake for this occasion and I also wanted to send that to Ria dear’s Celebration event. I did bake one, but it was a disaster :(. So I decided to go for a Kerala style b’day celebration. Ria dear, sorry for not making it this time :(.
Ok, thank you for your time and patience, here is the recipe, finally!
Note: I’ve posted this originally as Palada Pradhaman. I changed it to Ada Pradhaman, since some readers pointed out that palada pradhaman is made with milk and the one I made with jaggery is just Ada Pradhaman.
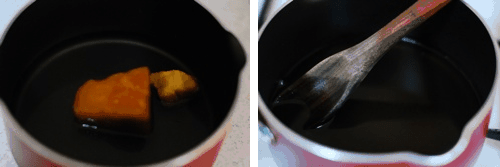
Cook the ada in 2-3 cups of water, till it becomes soft. Strain the ada and wash it in cold water to remove the stickiness. Add 3 tbsp of water to the jaggery & melt it. Strain the melted jaggery.
In a deep bottom pan, combine melted jaggery, cooked ada & 2 tsp of ghee. Cook on low – medium heat till the mixture becomes thick and start separating from the pan. Add medium thick coconut milk. Cook on medium -low heat and stir in between. When the coconut milk reduce to half the quantity, add thick coconut milk and stir well. Cook for 3-5 minutes.
Kindly note that the payasam will thicken itself later on, so after adding thick coconut milk, do not keep it for a long time. Add crushed cardamoms, just before removing from the gas.
Heat 1 tsp of ghee in a pan & fry the coconut slices & cashew nuts. Add it to the payasam. Serve hot.
I still remember the eagerness on their faces when they entered the room… the eagerness to know the magical number sealed in that small envelope in their Project Manager’s (PM) hands. Those numbers were an indicator of how much their work was appreciated. This is one of the fondest memories that I have from my very short career life.
As an HR professional, I was a part of the process that delivered those envelopes. Unfortunately I didn’t get an envelope at that time because I was serving my notice period. Honestly, I didn’t care much… I was eagerly waiting for my mega bonus in Bahrain… you know who ;) Moreover I thought I’ll get my envelope in my next job. But Life had other plans for me, though I worked in 2 more companies, envelopes seemed to be an extinct species.
I thought about those magical envelopes again when I was jobless & ‘blogless’ ;) I was sad about missing my chance of experiencing that feeling and wondered whether I’d ever get another shot. Well, I was wrong again. Today, I’m getting my magical numbers on a daily basis. But then I haven’t celebrated the numbers so far. Each time I planned to celebrate, my Project Manager (read Jose) reminded me that what matters is quality and not quantity, (as if I didn’t know) and he gave me new goals & targets like a ruthless PM!
Anyways now I’ve decided enough is enough. Let’s celebrate. I’ve decided to dump the PM & I’d like YOU, my team mate to join me in this celebration. Ohh I haven’t told you what we’re celebrating right? It’s a small number game, MariasMenu FB page has 1,000 + likes. This is the third 1,000 for this site. The first was 2 years ago when we had more than 1,000 eyeballs a day, the second was a few months back… we crossed 1,000 subscribers. I know this is a very small milestone but I’m compensating for missing my chance of the magical envelope ;) Thanks a billion to you!
Btw, since we dumped the PM there is no sponsored giveaway :( I’ve only a virtual sweet treat for you below. Let’s see… I’ll try to convince the PM and arrange some nice giveaways next year… deal?
Since it’s Diwali time, I wanted to share an Indian sweet with you. Gajar Ka Halwa is something that I love. Though I’ve made it several times, I wasn’t able to record the measurements, hence the delay in posting. I’m not sure whether this is the authentic or traditional method, but this is how I make it :). Hope you too will like it. This is something that you can make, to satisfy a sudden sweet craving.
Wish you and your family a happy Diwali! May this festival season brings you joy & happiness & prosperity!
For more Diwali / Indian sweet recipes, click here.
Heat ghee in a pan. Add cashew nuts & fry it for a minute, remove from the pan & keep it aside. Add crushed cardamom & fry it for a few seconds. Add grated carrots & cook it for a few minutes. Add warm milk & sugar to this. Let it boil. Reduce the flame & cook till the carrots are soft & the milk is evaporated. Add fried cashews to this & mix well. Serve hot or warm with Vanilla ice cream.
Notes
The above quantity is just enough for 2 adults. I used Al Marai brand low fat milk. You can adjust the qty of sugar to suit your taste.
Here is a sweet treat to celebrate Vishu. I think I’ve told you before..that we dont celebrate Vishu on a large scale. I try to make payasam every year and that’s the only special dish on Vishu day. However there is also another celebration for me on this day. It’s my parents Wedding Anniversary. Also it was my brother’s b’day on 12th April and one more good news is there…we welcomed a new member to our family this month. My cousin sis Ammu is blessed with a beautiful baby girl. So all in all, its celebration time :)
I had this payasam for the very first time around 2 months back, during my stay in Kerala. There was something special about my holiday this time. That was the first time I spent so much time with my Appa. All these years he was very busy with work and once he retired & became free, it was my turn to be busy. But this holiday we compensated for all the lost quality time. Since my Amma is still working, it was just the two of us during the day. Though we mostly ended up debating about almost every topic under the sun (at times, Sarasa checy came running from the kitchen wondering what’s all the commotion in the living room & another time our driver parked the car on the side road saying that he will drive only if we stop arguing..and what were we arguing about…ohh yeah Balakrishna Pillai, an ex Minister of Kerala being sent to jail, now you got a picture right ;)) we had so much fun. We went shopping together, dining out together & was even planning to go for a movie, but that didnt work out :(
Usually when I’m at home, I try my best to be at least 10 feet away from the kitchen. Because when I’m on holiday, sweating up in kitchen is the last thing I wanna do ;). So Appa & Amma never had a chance to experience my cooking (except once and that’s another story). I decided to make Gothambu Payasam with a little help from Sarasa chechy, since it’s my Appa’s fav. He liked it very much & I was a happy girl. As I said, it was the first time I had this payasam. I’m a die hard fan of Parippu payasam and always looked down at this as a poor cousin of parippu payasam. But I was wrong. After all I’m game for anything with jaggery, coconut milk & ghee. How wrong can it be :)? Since the excitement factor was too much when I made it at home, I completely forgot to note down the measurements. So I made it today again, just to give you the correct measurements & not because of my love for payasam. See I do take pains & make sacrifices for you ;)
Here is a picture of broken wheat, just in case you are curious, how it looks like…
Wish you a very happy Vishu! Hope you celebrate it with your loved ones. Hope you like our Vishu Kaineetam.
PS: I’m free tomorrow, if you are making a Sadya & wondering whom all to invite :)
Pressure cook the cleaned broken wheat with 4 cups of water. I cooked it on high flame for around 6-7 whistles. Keep it closed for 15 mins. Drain if there is any excess water. Meanwhile melt the jaggery with ½ cup water. Strain the melted jaggery. Combine the melted jaggery & cooked wheat. Add 2 tsp of ghee to this. Cook this mixture, till the melted jaggery is completely dried. Add medium thick coconut milk to this & combine well. Let it boil. When it attains a thick consistency, add thick coconut milk. Give a good stir & mix well. Add crushed cardamom also. Let it cook for 5 more minutes on low flame & remove from fire. Keep in mind that the payasam tends to thicken as it cools.
Heat 1 tsp ghee in a small pan & fry the bite size coconut pieces first, when it starts changing colour, add cashews & raisins also & fry it. Garnish the hot payasam with fried coconut pieces,raisins & cashews. Serve hot.
Notes
The color of the payasam very much depends on the type of jaggery used. I used coconut milk powder the second time. To make a cup of medium thick coconut milk, add 2 heaped tbsp of coconut milk powder to a cup of warm water. For a cup of thick coconut milk, add 3 heaped tbsp of coconut milk powder to a cup of warm water. You can increase or reduce the qty of ghee to suit your taste. Also before adding melted jaggery to wheat, make sure that wheat is cooked well.
Have you noticed that I haven’t posted that many recipes of Indian desserts/sweets here? Well, I’ve posted a number of Payasam/Kheer recipes and a Gajar (carrot) Halwa recipe and my Indian dessert recipe collection ends there. I’m not sure why I haven’t tried any major Indian desserts. Somehow I’ve associated it with too much of work and too much of ghee. I may be completely wrong, but I didnt bother to prove it otherwise.
Then this Rasmalai happened! We had this first at one of our friends, Abishek & Simi’s place. Jose fell head over heels in love with this one! Ever since he had that Rasmalai, he has been asking me to make it for him. Well, the loving wife that I am, it only took 3 years for me to grant his wish ;) The other day, when I was feeling all lovey dovey and wanted to surprise my husband (well there was a secret agenda of getting some things done on the site ;)) I decided to make this and that too under expert supervision. So I called up Simi and checked whether she was free. Luckily it was her day off from work, so I packed up everything and landed at her place. We had a fun time cooking, eating, gossipping and discussing about food. She is a major foodie and loves to experiment new stuff, all in all I had a gala time :) Thank you Simi for the recipe and for your time!
I’ve used Haldiram’s tinned Rasgullas for making Rasmalai. Though I’ve a bit of patience when it comes to cooking, I dont have that extra bit of it in me to make this from scratch ;) Ok, I need to tell you something. In the intro of most of my recipes, I usually tell you its easy and quick, but there is a slight modification for this one. It’s easy, but not quick! You need to reduce the milk to almost half the qty and it will take around 1- 1.5 hours, if it’s done on low flame! Ideally, it has to be done on low flame, otherwise, it may get burnt too, you dont want your Rasmali to look like it’s caramelised, right? I can assure you one thing, making this is time well spent and you will not regret. That deal sounds good, right?
Btw, I had posted a Rasmalai recipe long time. But it wasnt the real deal, so I deleted that and adding this new one.
Here you go…
Soak saffron in hot milk. Soak the pistachios and almonds in hot water to blanche them.
Heat milk in a deep and wide pan. Bring it to a boil.
Cook it on low flame till it reduces to half the quantity. Add saffron milk and sugar and stir.
Squeeze out the sugar syrup from the rasgullas and add it to the milk one by one. Add finely sliced blanched almonds and pistachios and crushed cardamom seeds and continue to cook on low flame for 10-15 more mins.
For more Diwali / Indian sweet recipes, click here.
Milk – 1.5 ltr full fat (I used Al Marai brand full fat milk)
Rasgulla – 1 kg tin/14 pieces (I used Haldiram’s)
Sugar – 7-8 tbsp (refer notes)
Pistachios – 10-15
Almonds – 8-10
Saffron – a big pinch
Hot milk – ¼ cup (to soak the saffron)
Cardamom – 6-7, (discard the skin and use only the seeds)
Instructions
Soak the pistachios and almonds (if you are using the ones with skin) in half cup of hot water for 15-20 mins, to blanche them. Soak saffron in ¼ cup of hot milk and keep it aside.
Heat the milk in a deep and wide vessel and bring it to a boil. Reduce the flame and let it simmer, till it reduces to half the quantity. It took almost 1.5 hours for me on low flame. Keep stirring in between (refer notes). Place a ladle in the milk pan, so that it doesnt boil over.
When milk is reduced to half the quantity, add the saffron milk and sugar to this and give a stir. Squeeze the sugar syrup from the Rasgullas gently and add it to the milk, one by one.
Remove the skin of pistachios and almonds and slice them finely. Do a taste test and add more sugar if required. Add the sliced pistachios, almonds and crushed cardamom seeds to the milk and continue cooking for 10-15 mins.
Serve it hot or cold.
Notes
You can use Amul Gold tetra pack milk also for this. It will be more creamier and takes less time to thicken.
The trick is to keep stirring the milk even when on a low flame as a lot of fat tends to settle at the bottom of the vessle and burn, which is a waste
The quantity of sugar varies for each person. We are squeezing out the sugar syrup from the rasgulla before adding, otherwise it will become more watery and less creamier.
The milk tends to reduce while it rests as the Rasgullas will absorb the milk.
I was thinking… should I post a Diwali recipe or not? These days I’m surrounded with Diwali celebrations, both virtually and in reality. So, even though it’s a festival that we dont celebrate at home, there is no harm in starting something new, right? There wasnt any doubt about what to make, it has to be a sweet. Because, the first thing that comes to my mind when I think about Diwali is the red coloured printed “Mithai (sweets) Box”. There is one more reason… it was Jose’s b’day yesterday and he loves this kinda sweets. So this year we celebrated his b’day with this wonderful sweet instead of a cake.
Now which sweet to make… that took some time because I didn’t want to make any complicated and time consuming one. I wanted a simple no fuss recipe and that’s how I ended up with this one.
I tasted this the first time, when My friend Simi made this for us. I remember she saying that it’s a very simple and quick sweet to make. I called her asking for the recipe, but since it’s Diwali time, I got a double dhamaka offer. Yep, she agreed to come to my place and make it with me, thank you Simi! :) We had a great time making this. It’s always nice to have somebody in the kitchen to keep you company, especially when you are making something like this… don’t you think so?
If you are yet to decide whether to join the celebrations or not, don’t hurry, you’ve time. Yep, this is something, you can make as a last minute thing :)
We, Jose and myself, Wish You a Happy and Safe Diwali!!
Check out the step by step pictures…
Soak kesar in 1 tbsp hot water for 10-15 mins. Mash paneer coarsely…
Add condensed milk and milk powder to crumbled paneer. Heat the mixture in a thick bottom pan. Cook on low – medium heat with constant stirring till the mixture becomes thick and starts leaving the sides of the pan…
Remove from the fire and spread onto a greased plate/tray. Level it with the back of a spoon or a spatula…
Sprinkle cardamom powder and saffron soaked in hot water & top with pista slivers. Refrigerate for a minimum of 45 mins to set. Cut into squares. Keep refrigerated…
For more Diwali / Indian sweet recipes, click here.
Soak Kesar/saffron in 1 tbsp hot water for 10-15 mins.
Mash paneer coarsely and mix in condensed milk and milk powder. Heat the mixture in a thick bottom pan. Cook on low – medium heat with constant stirring till the mixture becomes thick and starts leaving the sides of the pan. Remove from the fire and spread onto a greased plate/tray. Make sure you dont spread it too thin. Level it with the back of a spoon or an icing spatula.
Sprinkle cardamom powder (discard the skin and powder the seeds only) and saffron soaked in hot water & top with pista slivers. Refrigerate for a minimum of 45 mins to set. Cut into squares. Keep refrigerated.
Notes
If you are using frozen paneer, soak it in hot water for 20-25 mins, to soften it, so that you can mash it easily.
To remove the skin of pistachio, soak it in hot water for 5-10 mins.
It’s ideal to use a rectangular or square tray/tin for this. I used my swiss roll/jam roll tin. The thickness of the sweet depends on the type of plate/tray you use.
You can serve it straight from the fridge. However keeping at room temp for 15-20 mins before serving, will make it more softer.
You can store it in the fridge for 5-6 days in an airtight container.
Which food item comes to your mind when you think of Christmas? Is it Fruit Cake and Wine or is it something like Appam & Stew? Ok, tell me.. do you have any crunchy munchy snacks like Diamond Cuts associated with Christmas? Now, this particular snack is something which my Ammachi (maternal grandmother) used to make. Ammachi used to make sharkkara varatti (jaggery coated chips) during Onam time and this chips during Christmas time. I remember eating them out of big aluminium dhabbas (containers) during my childhood. I had it very rarely after my Ammachi passed away.
During my recent trip to Kerala, my Amma made this. She got a “vazhakkula” and made banana chips, this one and sharkkara varatti(jaggery coated chips). I should say, it was a sight to see! As I’ve said before, Amma gets into the cooking mode very rarely. When she switches onto that mode, it’s almost like a kid playing with a new toy. The excitement is always sky high! The initial plan was just to make chips. But since I was roaming around the kitchen with my camera, her excitement doubled and she got the idea of making this. Immediately, a few calls were made to her sisters to get the technical know how of it and she swung into action.
I actually felt like clicking her pictures to capture the various expressions. When these chips took it’s final shape, her face was beaming with pride, excitement and happiness. I’m not sure whether it’s the result of simple joy that cooking gives you or the joy of being able to recreate something that her mom used to make! After all food is always served with a plateful of memories on the side, right? Her excitement didnt end in the kitchen. Whoever visited our home after that, got a taste of these chips along with a generous share of her excitement :)
Well, it tasted great! She packed a small batch for Jose also and after tasting it, he didnt even allow me to touch the packet! I managed to keep aside a few, so that I can take some pictures and share it with you too. Here you go Amma, this post is for you! May the joy of cooking fill your life more often ;)
May be you can try this sugar coated chips instead of sugar cookies for a change, what say, my friend :)
Step by step pictures…
Cut the peeled plantains into oval shaped slices. Sprinkle salt and turmeric powder and give it a good shake.Heat oil in a deep pan/wok. When oil is hot enough, add the sliced plantains. Stir in between and make sure the chips arent sticking together. Fry till it turns crispy.The chips should be slightly crispier than the normal banana chips. Remove it from the oil using a slotted spoon and drain on a tissue paper.
Heat together the sugar and water in a pan. When the sugar has melted completely and the syrup has reached single thread consistency, remove from fire. Stir continuously for 2 more mins and add crushed cardamom…
Add chips to the syrup and make sure that all the pieces are coated well with the syrup. Spread out the chips in the pan itself and allow the sugar to crystallise…
Panchasara Varatti (Banana Chips Coated with Cardamom Flavoured Sugar Syrup)
Author: Maria Jose
Recipe type: Snacks
Cuisine: Kerala
Prep time:
Cook time:
Total time:
Serves: 3-4
Ingredients
Raw green plantains – 500 gms (2 large)
Turmeric powder – ¼ – ½ tsp
Sugar – 100 gms
Water – 50 ml
Cardamom – 4-5
Sugar – 1 tsp
Salt
Oil – for deep frying
Instructions
Peel the plantains and soak them in water for a min or two. Pat them dry using a clean kitchen towel. Cut them into oval shaped slices. It should be slightly thicker than the normal banana chips (refer the step by step pics). Sprinkle salt and turmeric powder and give it a good shake.
Heat oil in a deep pan/wok. When oil is really hot,reduce the flame to medium-high and add the sliced plantains.You can add one slice and check whether the oil is hot enough. Make sure you dont overcrowd the pan. You can fry it in 2-3 batches, depending on the size of pan, you are using.
Stir in between and make sure the chips aren’t sticking together. Once the chips are ready, it will make a specific sound, when you stir it. After hearing that sound, reduce the flame to medium and cook for a few more mins. This chips should be slightly crispier than the normal banana chips. Remove it from the oil using a slotted spoon and drain on a tissue paper. Let it cool completely.
Check out Annita’s post to see a detailed version of making banana chips (http://deepann.wordpress.com/2008/08/19/vaazhakka-upperiplantain-chips/)
Powder the cardamom along with 1 tsp of sugar in a mixie.
Take a wide pan and add sugar and water. When the sugar melts completely and reaches one thread consistency (refer notes for details) remove it from fire. Keep stirring continuously for 2 more mins and add crushed cardamom powder and chips. Keep stirring it, till all the pieces are well coated with the sugar syrup. Make sure the chips aren’t sticking together, separate it using a fork, if it’s sticking together. Spread it out in the pan itself and let it cool. Once it’s cooled completely and the sugar has crystalised, store it in an airtight container. It keeps well for 2-3 weeks.
Notes
The qty of sugar mentioned in the recipe, gives a thick sugar coating. If you prefer a thin coating of sugar, adjust the qty of sugar accordingly.
To check whether the sugar syrup has reached single thread consistency, drop the syrup in a few drops of water in a bowl. If you are able to roll the syrup into a non sticky ball, then the syrup is ready. Please check out the following link to see the detailed pics:
http://www.spiceindiaonline.com/boondi_laddu_0/
Though I’ve mentioned in the recipe to make sure that the chips dont stick together, it’s ok even if they do.
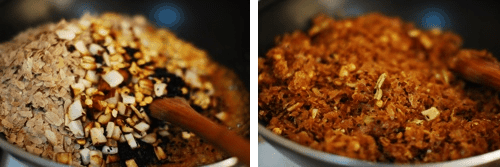
Do you have withdrawal symptoms if you dont get to taste something sweet after lunch or dinner? I’ve seen some people eating spoonfuls of sugar, just like that, to satisfy the urge. Though I don’t go to such dire situations, I crave for something sweet at times. This payasam happened on one such day.
Earlier I used to stock up something sweet all the time, but recently I’ve stopped that to form a healthy eating habit. These days, I snack dates or dried figs, when I feel like eating something sweet. But some days, I’ve this unstoppable itch to cheat. On such days, this is my go to recipe. It’s a quick fix dessert. It’s ready in less than 10 mins!
That reminds me… I should tell you something. Whenever I make the usual style of porridge with oats, it just tastes yucky! I know it’s not an adjective you expect to see on a food blog. But that’s the truth. Since there is so much of hype about “oats” these days, I wanted to include it somehow in our food. This payasam style suits me the best! I’m a big fan of anything with jaggery and coconut milk. From my experience, you can never go wrong with that combo.
Usually I don’t follow any particular measurements while making this, I just throw in whatever I feel like. But, since I wanted to share this with you, I noted down the measurements last time. Still, I’d suggest you to use this recipe as a guideline and you can work on it as you go, to suit your requirements. It’s an ideal recipe if you are looking for some healthy and nutritious dishes for your kids. I think they will like the smooth texture and sweetness of the dish. All in all, I’d say this recipe is definitely value for your time and effort, not to forget the money part too ;)
Since it’s a payasam recipe, I thought I’ll post this as Vishu special. Also, it’s my parents wedding anniversary on Vishu day. If there is one thing that they both agree unanimously, it’s sweets, especially payasam ;) They both have sweet tooth big time, so this post is for them too. Appa and Amma, wish you a very happy anniversary!
Wish you a Happy Vishu!
Here are some recipes for Sadya, if you are planning to make one.
Add ⅓ cup water to the jaggery and melt it. Strain the melted jaggery. Add oats to the strained jaggery. Cook till the jaggery is dried up. Add medium thick coconut milk, bring it to a boil. When it starts to thicken, add crushed cardamom and thick coconut milk. Stir well. Cook on low flame for 5 mins.
Heat ghee in a pan and fry the cashews and coconut bits, till it turns golden brown. Add this to the payasam and serve hot.
Notes
Usually I dont add cardamom, cashew, ghee and coconut bits. Also, I use only medium thick coconut milk. I use maggie coconut milk powder to make this. You can adjust the qty of coconut milk to suit your requirements. Please keep in mind that it thickens as it rests, so adjust the consistency accordingly. If you are making it for kids, you can increase the qty of ghee.
Do you dream? Ok, I was specifically asking about dreams in sleep, because I know we all tend to day dream a lot ;) So, tell me do you believe dreams are signs?
I do dream a lot in my sleep. Sometimes they are happy, sometimes it’s scary. Most of the time I remember clearly about the dream. I’ve noticed something… my dreams are very much influenced by my state of mind when I go to sleep. If I go to sleep in a good frame of mind, I end up having funny or happy dreams and vice versa. Jose used to say that at times I even giggle non stop in my sleep. I didn’t believe him, so he recorded it one time to show me ;)
I also have lots of weird dreams which doesn’t make any sense at all. Here’s a sample one… I started the dream with Jose, his mom and me having a tea time chat. We are just chatting in general, after a few minutes, we are still chatting, but instead of Jose and his mom, I see Mohanlal and Kaviyoor Ponnamma (the actress who usually plays Mohanlal’s mom in movies) in their place! The conversation still continued in full swing and I didnt feel anything abnormal about it, strange right? Well let’s forget the fact that I used to be a biiiigggg Mohanlal fan during my childhood and wanted to marry him, but it didnt make any sense now… because these days I dont mind marrying Ranbir Kapoor ;) God help me!
Though I dream very often, food dreams are a rarity. So the other day I was a bit confused when I got up from my afternoon nap, nibbling something and wiping my hands on the dress. I almost felt the taste of the crumbs in my mouth and was dusting the powdered crumbs from my hand. It felt so real! I was eating maladu in my dream!
When I was truly awake, I wanted to have maladu. I was thinking, what caused this sudden craving for maladu. The culprit is my Facebook news feed. These days, most of my FB updates are about Diwali sweets!
Maladu is one of my fav sweets. Though Laddus are very common in Bakeries, Maladu is not so common. It’s available only in select shops. Whenever I go to Cochin, I make sure to get a bag full of these and have it till I become sick of it! Though I rarely act upon any of my dreams (coming to think of it,if I start acting on my dreams, I’m sure Jose will chuck me out soon ;)) made an exception for this one and ended up with this Maladu.
If you’ve already tried Maladu, I’m sure you are in love with it. If you haven’t tried it yet, please do try, I’m sure you wont be disappointed!
I got the recipe from Renu’s blog. It was her pic of Maladu that made me drooling in my sleep ;)
Here you go…
Roast the roasted gram dal for about 3 and 1/2 minutes, till a nice aroma comes and the colour starts to change. Let it cool completely. Powder the roast gram dal very finely…
Powder the cardamom seeds along with the sugar very finely…
Sieve the powdered gram dal and sugar to a big and wide bowl. Add the ghee gradually into the mixture and mix well…
Shape the laddus when the mixture is warm itself. Roll it in your palms tightly. If its crumbling while rolling add a little more melted ghee…
For more Diwali / Indian sweet recipes, click here.
Roast the roasted gram dal (yes, it has to be roasted again,though the name says roast gram dal) for about 3 and ½ minutes, till a nice aroma comes and the colour starts to change. Let it cool completely.
Powder the roast gram dal very finely. Powder the cardamom seeds along with the sugar very finely.
Sieve the powdered gram dal and sugar to a deep and wide bowl. Add the ghee gradually into the mixture and mix well.
Shape the laddus when the mixture is warm itself. Roll it in your palms tightly. If its crumbling while rolling add a little more melted ghee.
It should be tightly rolled,otherwise it will break.
Store it in an airtight container
Notes
I got around 14 small size laddus from the above qty. Add ¼ cup ghee first and and if the laddus are crumbling add more ghee. You can also fry some cashews in ghee and add to the powdered sugar and gram.
You can store it in an airtight container @ room temp for a week or so.
Here’s another quick and tasty sweet recipe for Diwali. This is a perfect recipe, if you dont want to spend too much time in the kitchen. Hope you will enjoy this sweet treat.
Wish you a happy and safe Diwali!!
For more Diwali / Indian sweet recipes, click here.
Heat ½ tbsp ghee in a pan and roast the cashews till they turn golden brown. Transfer this to a deep and wide bowl. Fry the raisins till they become plump and transfer to the bowl.
Add grated coconut and roast it for 2-3 mins, they dont have to change colour, keep it with cashews and raisins. Add remaining ghee and roast the rava. Roast it for 5 mins, till the roasted aroma comes. Transfer the roasted rava also to the bowl.
Add powdered sugar and cardamom to the rava coconut mixture. Mix well. Add the milk gradually. Do not add the whole qty of milk at a time. Add half of the milk and try shaping the laddus, if it isnt moist enough add the rest of the milk. Shape laddus as per your preference.
Notes
I got 18 small size laddus from the above qty. Add ¾ cup of powdered sugar initially and do a taste test. If you prefer a sweeter version, add more powdered sugar.
The laddus will harden a bit on the outside in a few minutes of shaping them, but the inside will be moist and soft.
You can keep the laddus at room temp for 2-3 days and in the refrigerator for 4-5 days.
I’m not sure why I go around making such announcements and proclamations, when I’m almost certain that I wont be able to keep them. I think I like to make myself believe that I’m capable of leading a very disciplined and ordered life… it’s all about perceptions! Do you do such things? I mean… trying to make yourself believe that you are capable of doing certain things, when in reality, even when you’re not so keen about it?
Ok, before I go on blabbering and waste your time, let’s go to the recipe. Here’s one more recipe for Unniyappam. I’ve already posted a recipe before, which uses a combination of rice flour and plain flour. I’ve been getting mails asking for Unniyappam recipe with just rice flour. Came across this one and it worked out well :) It’s pretty easy recipe, the only thing you’ve to be careful about is the frying part. If you get the right temperature for frying, there is no looking back. Unlike the earlier recipe I posted, this recipe doesn’t call for resting of the batter before frying. So if you’ve all the ingredients, it’s pretty easy to fry it up ;)
If you are planning to make Sadya, please check out the recipes here.
Wish you and your loved ones a Happy Vishu!
Here is the recipe…
Melt jaggery in 1 cup water till it becomes syrupy, but not thick…
Add the melted jaggery to the rest of the ingredients and mix well. The batter should be of dropping consistency. If the batter is too thick, add water to loosen it…
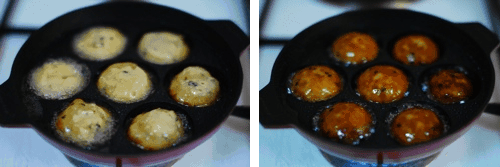
Heat oil in Uniyappa chatti, make sure the oil is hot, but not smoking hot. Drop spoonfuls of the batter into hot oil and deep fry till golden brown…
Recipe adapted from “Flavours of the Spice Coast” by Mrs.K.M.Mathew
Black sesame seeds – ½ tbspn (optional), fried in ghee
Mashed ripe bananas – ½ cup (mashed it in mixie)
Sugar – ½ tbsp
Bicarbonate of soda – ⅛ tspn
Oil- for frying (I used coconut oil)
Instructions
Melt jaggery in 1 cup water till it becomes syrupy, but not thick. Add the melted jaggery to the rest of the ingredients and mix well. The batter should be of dropping consistency. If the batter is too thick, add water to loosen it. I added 3-4 tbspn of water.
Heat oil in Uniyappa chatti, make sure the oil is hot, but not smoking hot. Drop spoonfuls of the batter into hot oil and deep fry till golden brown.
Notes
I got around 30 small size unniyappam from the above qty. I used cheru pazham in this recipe. You can also make it using chiquita. I med – big size will be enough for the above qty.
Though I havent tried shallow frying, I think you can do it. But the look and texture may be a bit different.
Initially I heated the oil at med-high and then reduced to low-medium and fried the unniyappams. Make sure the oils is at right temp, otherwise the unniyappam will brown fast but the inside remain uncooked. Do a trial and error with a few unniyappams to get the right temp. You can store it at room temp for 2-3 days. For longer storage, refrigerate it and microwave for a few seconds before serving.
Onam is almost here… My FB wall is filled with Onam related posts, mostly pictures of Onasadya and Pookalam. I was hoping to celebrate Onam in Kerala this year, but it didnt work out. It’s been more than 12 years that I celebrated Onam in Kerala. I miss the Payasam melas the most. During Onam season, you can see many make shift Payasam stalls where you get to taste piping hot Pal Payasam, Parippu Payasam etc; The thought itself makes me miss home…
For the past few years, I’m seeing so many different recipes for Payasam be it in Kerala based Magazines, newspapers or blogs, it’s like any ingredient can be turned into a payasam. I’m all for innovation and discovering new recipes and tastes, but when it comes to food during festive season, I’m a bit conservative. I prefer the traditional tastes, for Onam I like Pal Payasam or Parippu Payasam. It’s the same for Christmas and Easter too. If I dont get to eat Appam and Stew for Christmas and Easter breakfast, it doesnt quite feel like Christmas or Easter, I feel something is missing. What about you? Do you like to try new recipes during festive season or go with the tastes that you grew up with?
I’ve posted recipes of Carrot Payasam, Pineapple Payasam etc; but come Onam and Vishu, it has to be a traditional payasam. I’ve already posted Parippu Payasam recipe, using Cherupayar parippu (mong dal), but I’ve been getting requests for Kadala Parippu payasam. Though Kadala Parippu Payasam is comparitively new to me, it’s one of my favourites. It’s not surprising considering the fact that I love the combination of coconut milk and jaggery, add some mashed dal and ghee to it, even better!
Wish you and your loved ones a Happy Onam! Hope this festive season fills your body and soul with yummy tastes and wonderful memories!
Chana Dal / Bengal gram (kadala parippu) - 1.5 cups
Jaggery - 500-550 gms (refer notes)
Thin coconut milk - 4 cups
Medium thick coconut milk - 3 cups
Thick coconut milk - 1.5 cups
Coconut bits (thengakothu) - ½ - ¾ cup
Crushed cardamom - 3
Cashew nuts - ½ cup
Ghee - 3-5 tbsp
Instructions
Wash chana dal. Heat 2 tsp of ghee and roast the dal on low flame in a pressure cooker, till the nutty aroma comes 4-5 mins, make sure you dont brown it. Add 3 cups of water and pressure cook, till it's done (refer notes).
Mash the cooked dal using a wooden spoon. If you prefer a small bite, dont mash it too much. However if you prefer a smooth texture, mash it nicely.
Melt the jaggery by adding ½ cup of water. Strain the melted jaggery and add it to the mashed dal.
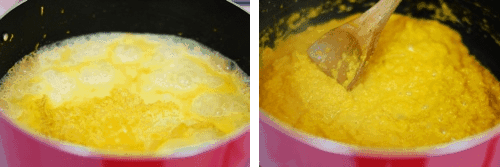
Cook the melted jaggery and mashed dal in a wide and deep non stick pan, on low flame. Cook till the mixture becomes thick and the melted jaggery is almost dried. Make sure you stir it in between, to prevent it sticking to the bottom. Add 2 tbsp ghee and mix well.
Gradually add thin coconut milk to this and mix well. Bring it to a boil. Simmer it on low flame till the mixture reduces to almost half the quantity. Add medium thick coconut milk and stir well. When it boils, reduce the flame to the lowest and cook till the mixture thickens, 10-15 mins (it can take longer also)
Add thick coconut milk and stir well. Do not boil. Keep stirring and cooking on low flame for 5-7 mins. Add crushed cardamom powder.
In a small pan, heat the remaining ghee and brown the cashews first, drain it on paper towel. In the same pan, add more ghee, if required, add coconut bits and fry till it turns golden brown. Add this and the fried cashews to the payasam.
Notes
The payasam tends to thicken a lot while it rests, so adjust the consistency accordingly. I've used coconut milk powder to make this payasam. Do a taste test to see the sweetness of jaggery, accordingly adjust the qty. Pressure cooking the dal - After the first whistle comes on full flame, reduce the flame to low-medium and cook for 4-5 whistles. Keep it closed for 15-20 mins or till pressure drops. Open the cooker and mash the dal. make sure you mash the dal while it's still hot, otherwise dal tends to harden. Payasam keeps well in the fridge for 3-4 days. You can heat it in microwave or stove top.
I cook for two people on a daily basis. When I’m calling guests also, I make sure not to call more than 10-12 people. What I’m trying to say is I’m not into wholesale cooking, hhmm coming to think of it, I’m not a “group” person. I’m more of a one to one person. I was also removed from a whatsapp group recently for being inactive, wait a min… does it make me sound like a sad person??
Ok, we got diverted from the topic… I wanted to tell you that I’m kinda clueless when it comes to cooking for a large group of people. When you send me mails and comments asking about the measurements for cooking for 25-30 people, I’m literally stumped! All those permutations and combinations make me exhausted. So you can imagine my situation, when I was asked to cook for a potluck party of 30 people. I volunteered to make Erissery. I thought it’d be a better idea to decide how much to buy, once I reach the shop, so when I see the pumpkin, I’ll have a clearer picture.
Reached the shop with a clean slate of mind, checked out the pumpkin from a distance, nothing, stood close to it and looked from different angles, still nothing and finally took a piece in my hand, as if holding the pumpkin will lead to automatic display of the magic figure, absolutely nothing!!
Well, let’s try walking across the aisle. Walking is supposed to stimulate clear thinking, good idea! Felt some small tremors and my mind started to play around the number 2.5. Well, something to start with, so went back, round it off and took 3 kg. Started checking other items on the list, but felt restless, went back to the veg aisle and got 1.5 kg more, feels good! Went to the cash counter, standing in the queue, something didn’t feel quite right. Went back again to the veg aisle…
All you need to know is that I bought 90% of the pumpkin available in the shop!
I should’ve gotten my cue when the staff at the veggie counter asked “haa chechy oru nooru perkku sadya undakkanullathundallo, entha paripadi”? (Hey sister, are you making feast for 100 people?). Ok, you might be wondering why I didn’t ask somebody who had experience cooking for large groups. I agree, that’s what people with common sense do.
I’ve a theory… there are certain things, you need to experience yourself or make the mistake yourself to learn something new. Do you agree with me? That day felt like a good opportunity to test my theory and I did learn a new lesson, ask for help when in doubt. Well, I kinda knew that, just wanted to reinforce that ;)
Needless to say I used very little of what I bought, and I never like to waste food :) Whoever visited us that week got a statutory return gift, you don’t need to host a party to give return gift right? I always used to wonder why people take all the effort to make things like squash and jam at home. Now I know why.. there’s only so much you can distribute without raising suspicion ;)
Though I had to make this Pumpkin Halwa, more out of necessity, than out of desire, it turned out well. All is well that ends well, right?
I loved the colour of this halwa and also liked the flavour combination of pistachio, saffron and cardamom. Though the halwa looks rich, it’s light on your tummy. It’s a good recipe to try if you like this kind of sweets/ desserts.
If you are looking for some easy and simple sweets to make for Diwali, check out the recipes here.
Wish you and your loved ones a Happy Diwali!!
Here’s the recipe…
Heat ghee in a deep and wide pan. Add grated pumpkin and stir. Cook on low flame for 7-8 mins, till pumpkin shrinks and becomes a little mushy…
Add hot milk and bring to a boil. Reduce the flame to low and cook till the milk is almost dried. Stir in between…
Add crushed cardamom and condensed milk and mix well. Cook for another 5-6 mins, till the condensed milk is dried and the mixture starts leaving the side of the pan. Add sliced pistachios and saffron milk (if using), mix well and remove from fire. Serve warm…
Recipe type: Indian Sweet, Indian Dessert, Diwali Sweet
Cuisine: Indian
Serves: 5-6
Ingredients
Pumpkin - 1 kg
Hot milk - 2 cups
Condensed milk - ¾ - 1 tin of 495 gms
Crushed cardamom - 3
Sliced pistachio/cashew/almonds - 1 tbsp
Saffron a pinch soaked in 1 tbsp hot milk (optional)
Ghee - 2-3 tbsp
Instructions
Discard the seeds and peel the skin of pumpkin. Grate the pumpkin.
Heat ghee in a deep and wide pan. Add grated pumpkin and stir. Cook on low flame for 7-8 mins, till pumpkin shrinks and becomes a little mushy. Add hot milk and bring to a boil.
Reduce the flame to low and cook till the milk is almost dried. Stir in between.
Add crushed cardamom and condensed milk and mix well. Cook for another 5-6 mins, till the condensed milk is dried and the mixture starts leaving the side of the pan.
Add sliced pistachios and saffron milk (if using), mix well and remove from fire. Serve warm.
Notes
It stores well in the fridge for 2-3 days. Though you can have it chilled, I prefer it warm. I used ¾ tin of condensed milk, you can add more or less depending on the level of sweetness you prefer.
You can adjust the consistency to suit your preference, if you prefer gooey, cook only for a little time after adding condensed milk. If you like it dry, cook for a longer time.
One of my fav “Nalumani Palaharam” (tea time snacks) while growing up. Though it’s considered as a tea time snack, I used to have it for breakfast and lunch also. During my childhood days, whenever there was a big family get together, Aval Vilayichathu was one of the regular items. Since it can be made in advance and stored, it was always a go to recipe for huge gatherings. It’s always a good snack to have when you’ve a battalion of hungry kids to feed :)
Sometimes I get mails, asking for recipes which can be used for road trips. This dish stays fresh for 2-3 days at room temp, so if you are looking for a snack for your road trips, this is a good one.
Here you go with the recipe…
Dry roast the sesame seeds and keep it aside, In the same pan, heat ghee and fry, roasted gram dal (till you get the roasted smell) and coconut bits (till it turns golden brown) separately…
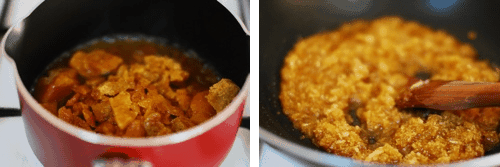
Melt jaggery with 1/3 cup water and strain it. Add grated coconut to this and cook on low flame. Cook till the jaggery reduces a bit and the mixture becomes a semi dry consistency…
Add aval and roasted ingredients to the coconut jaggery mixture. Cook on low flame for 3-4 mins, stir continuously. Remove from fire and keep stirring for 2-3 mins. Add crushed cardamom and mix well…
Heat ghee in a pan and fry black sesame seeds (lightly), roasted gram dal (till you get the roasted smell) and coconut bits (till it turns golden brown) separately.
Melt jaggery with ⅓ cup water and strain it.
Add grated coconut to this and cook on low flame. Cook till the jaggery reduces a bit and the mixture becomes a semi dry consistency.
Add aval and roasted ingredients to the coconut jaggery mixture. Cook on low flame for 3-4 mins, stir continuously. Remove from fire and keep stirring for 2-3 mins. Add crushed cardamom and mix well. Cover and keep for 20-25 mins.
You can eat it as it is or serve with banana.
Notes
Do a taste check of jaggery to assess the sweetness and adjust the qty accordingly.
Make sure not to cook the mixture for long after adding Aval, overcooking may harden the Aval.
If you want, you can add 1-2 tsp of ghee while cooking jaggery and coconut mixture.
Once it is cooled completely, you can store it in an airtight container in fridge for a month or so. Keep at room temp for 25-30 mins before serving or MW for a min or so. You can also store it at room temp in an airtight container for 2-3 days.
The first time I visited Dubai was during my college days. I was amazed by everything, the towering skyscrapers, the huge shopping malls, the blinding glitz radiating from the jewellery shops in gold souq, the international brands which I’ve only heard and read about, be it restaurants, clothes etc;
The second time I visited Dubai, was soon after my marriage. We just went for a weekend trip, visiting friends and family. This time I noticed something else, apart from the grandioseness of Dubai. The more I visited friends and family there, I saw an emerging pattern. Apart from “wowing” you with a food spread extending from one end of the room to the other, any food related sentence is prefixed or suffixed with the term “ithu naateenu ullatha, ketto” (this is from home, take note). If you’ve ever visited your friends or family abroad, I’m sure you must be nodding your head in agreement ;)
Today, almost all “nadan” items are available here, that too surprisingly better quality compared to back home. People have even started saying that you should go to Dubai, not Kerala, to see the real spirit and celebration of Onam! Whatever said and done, “naadu” and “naadan” items are very much a sweet nostalgia to the majority of Malayalees. As I’ve mentioned here, maybe it’s because anything you love, be it – a person, place or thing, appears to be more dear or beautiful in your mind when it’s taken away from you.
The so called “marunadan” Malayali still tries her best to keep up with the traditions they are familiar or grew up with and it’s most evident sign is the food. I think this is especially true during the festival season.
No festival is complete for us unless and until we enjoy the taste of food that reminds us of home. At least, it’s true in my case, I make sure to make at least one thing that reminds me of home during the festival season. So this time, I made Achappam for this Christmas season.
I dont know why, but for sometime, I had it in my mind to make Achappams this Christmas instead of regular cookies. Unusual I know…
If you arent familiar with Achappam, it’s a fried cookie kinda snack, may be that’s why it’s also known as Rose Cookies. I like it mildly sweet, but there are sugar coated Achappams too. It’s a traditional Kerala snack, which is now easily available in all bakeries. It’s one of my fav fried snack to munch on.
There is no fun in holiday cooking or baking, if you dont have company right? So I called my friend Sheena, got the recipe from her mom and we had a great time cooking, eating and gossiping ;) We both got very excited when the first Achappam slid off the mould easily, so much so that with the over excitement and enthusiasm the second one got stuck ;)
So now the recipe part, I was really surprised how simple and easy it is to make Achappams. The only tricky part is frying it, but am sure you’ll get the hang of it after 1 or 2 trials :) I’m sure homemade Achappams make a great gift during this holiday season.
Here is the recipe…
Put plain flour, rice flour, egg,sugar and salt in a mixie and blend just until smooth and without lumps. Add sesame seeds and Kalonji (if using)and stir well…
Heat oil in a deep and wide pan. Place the Achappam mould in it, while heating the oil. Once the oil is heated enough, it should be really hot, but not smoking hot, dip the heated achappam mould in the small vessel filled with batter…
Immediately dip the mould in hot oil and shake it a little so that the batter loosens into the oil…
Once it start getting brown around edges, flip the achappam using a slotted spoon and cook till both sides turn brown…
Please check out the notes section to see how to make Achappam without mould.
Kalonji/karinjeerakam/onion seeds - ½ tsp (optional)
Oil - for deep frying (I used sunflower oil)
Instructions
Put plain flour, rice flour, egg,sugar and salt in a mixie and blend just until smooth and without lumps. You can also Mix it well using a wooden spoon or manual whisk. Add sesame seeds and Kalonji (if using)and stir well.
Transfer some batter to a small and deep vessel.
Heat oil in a deep and wide pan. Place the Achappam mould in it, while heating the oil. Once the oil is heated enough, it should be really hot, but not smoking hot, dip the heated achappam mould in the small vessel filled with batter. Make sure you dip only ¾ th of the mould in the vessel, otherwise the batter may stick to the mould and and achappam won't slip out of the mold as as it should be.
Immediately dip the mould in hot oil and shake it a little so that the batter loosens into the oil. While the achappam is frying, place the mould in the oil (refer notes). Once it start getting brown around edges, flip the achappam using a slotted spoon and cook till both sides turn brown. Keep in mind the colour of Achappam tends to darken and hold it's shape as it rests.
Drain the fried Achappams on paper towel. Once it's cooled completely, store in an airtight container for up to 1 week at room temp.
Notes
I used 3.5 tbsp sugar and felt it was sweet enough. If you prefer a sweeter version, add 4 tbsp. But make sure you dont add more sugar, because if there is too much sugar, the batter might stick to the mould.
Adjusting the heat is very important in frying Achappams, Heat the oil in med-high flame, once it's really hot, reduce it to low-medium and fry.
Though the Achappams colour darken, it might appear to be soft, it will hold it's shape and crispiness as it rests.
You can also make it with just rice flour, in that case use 1 cup rice flour and follow the rest of the recipe. You may need to mix the batter in a blender. I tried both versions (just rice flour and a combination of plain flour and rice flour). We liked the the combo one better (mix of plain flour and rice flour).
Make sure you dip the mould in hot oil, each time, for a few minutes, before dipping it in the batter. Transfer more batter to the smaller vessel as and when required.
To season a new mould - wash it really well with soap and water, dry with a dish towel and immerse in really hot oil and keep it aside for a while. If you havent used your mould for a long time, soak it in tamarind water for 1-2 days(if it's brass mould do not do this step). If you are using a brand new mould, make sure you season it before using. After using the mould, wash and dry it and grease it with some oil.
If you do not have an Achappam mould, use a brass cookie cutter. Make sure you dip it in oil, using tongs and follow the rest of the recipe. The shape may be different, but you still get the taste of homemade achappam. See the picture below:
I was a bit confused, about how to start… whether to start with “beginning of another year” or “end of one more year”. Well, it’s always nice to hear that something new is beginning, so I’ll go with that.
Beginning of another year is here! I always feel excited when something new is taking place, a bit nervous too, but more excited to see how new thing works out. I’m not a resolution kinda person, so no New Year resolutions for me. How about you guys? Do you make any resolution, have you been successful in keeping it? In the past, I used to make some resolutions, nothing worked out for more than 1-2 weeks, so these days, no pressures and guilty feeling in that department.
Though I’ve started with “beginning of another year”, it’s difficult to move ahead into something new, without looking back or at least taking a peek into the past, right? I do hope this passing year was a good one for you. Hope you created some beautiful memories, which can be played on loop on your mind for the coming years.
This time I’m re-posting one of the oldest recipes from the initial days of blogging. It’s ok to get a bit philosophical at times like this right ;)? So the reason I’m posting this recipe is to remind myself about the good things in the past (this was one of my fav dessert recipe, which I’ve forgotten), to look back and see how far I’ve come (the old post doesn’t have any pic or write up), to see whether I can better myself (I made some changes in the ingredients list and a more detailed set of instructions).
In short, take a moment to relish the past, enjoy the present and look forward to the future!
To say more about the recipe, as I’ve already said this is one of the oldest dessert recipes around. It’s known in different names like sago pineapple pudding, sago pineapple payasam, pineapple payasam, chowari (sago) pudding etc; If you like milk based dessert, this is a must try. It tastes great once it’s chilled, the condensed milk makes it creamy, sago gives a beautiful texture and addition of pineapple is the topping of the cake.
So, let’s end this year and welcome the new one with a sweet note.
We wish you and your loved ones a beautiful New Year!! Stay Blessed!!
Here you go with the recipe..
Add 2 tbsp sugar to chopped pineapple and cook till the water is completely dried and pineapple becomes slightly mushy, but holding it’s shape.Let it cool completely.
Dry roast the sago for 2 mins. Boil 2.5 cups of water in a deep and wide pan. Add washed sago and cook. Stir in between to avoid lumps. Cook till the sago becomes transparent and soft when pressed between your finger tips…
Heat together milk and condensed milk in a deep and wide pan. Bring it to a boil and reduce the flame…
When it boils, add cooked sago and continue stirring and cooking till the mixture thickens, 10-15 mins. Remove the milk sago mixture from the gas and let it cool…
Once the milk sago mixture is cooled to room temp, add cooked pineapple and mix well. Chill in the refrigerator for 3-4 hours. Serve chilled…
Canned pineapple - 2 tins of 234 gms each / 8 rings (refer notes)
Sugar - 2 tbsp
Instructions
Drain the juice from the canned pineapple and chop them. Add 2 tbsp sugar to chopped pineapple and cook till the water is completely dried and pineapple becomes slightly mushy, but holding it's shape.Let it cool completely.
Dry roast the sago for 2 mins. Wash the roasted sago. Boil 2.5 cups of water in a deep and wide pan. Add washed sago and cook. Stir in between to avoid lumps. Cook till the sago becomes transparent and soft when pressed between your finger tips. The timing varies depending on the type and size of sago you use. Mine took around 25-30 mins.
Drain the water from the cooked sago and hold it in a sieve, under running water to remove the starch completely.
Heat together milk and condensed milk in a deep and wide pan. Bring it to a boil and reduce the flame. Keep stirring in between to avoid caramelising the milk at the bottom. When it boils, add cooked sago and continue stirring and cooking till the mixture thickens, 10-15 mins. Remove the milk sago mixture from the gas and let it cool. Even if the milk mixture doesnt thicken immediately, it will thicken as it rests.
Once the milk sago mixture is cooled to room temp, add cooked pineapple and mix well. Chill in the refrigerator for 3-4 hours. Serve chilled.
Notes
You can also use fresh pineapple instead of canned ones. Use a medium size pineapple and follow the same procedure.
The end product tends to thicken nicely, if you prefer a medium thick consistency, you can add a bit of milk to loosen it before serving.
Shall we start this New year with something that is comforting and familiar?
I went through my drafts several times to decide, what should be the first post for 2015. It got me to a stage where I was so confused and started pulling out my hair. Since I cant afford to do any more damage to my already thinning hair, I zeroed in on this recipe.
Also these days most people I meet, are talking about how their weighing machines is having a mind of their own and showing some extra pounds… Well I believe, it’s got to do with their weighing machine and not the extra pounds contributed by the holiday eating ;) All the more reason to share a light and simple and comforting recipe.
This is a glorified “moru kachiyathu” recipe. The addition of vellarikka and ground coconut gives a different texture to the gravy. Also the slight coco-nutty taste is a welcome change from the usual moru kachiyathu.
Here you go with the recipe..
Grind together coconut and cumin with 1/4 cup water to a smooth paste. Add ground coconut to buttermilk or whisked yogurt and mix well…
Cook together vellarikka, green chilli, turmeric powder with salt and 1 cup water. Cook till the vellarikka becomes tender and water is almost dried…
Add coconut buttermilk / yogurt mixture to cooked vellarikka and mix well. Stir continuously until the steam comes through the spatula. Dont let it boil. It will take around 5-7 minutes…
In another pan, heat oil and crackle the mustard and fenugreek seeds, add dried red chilli, small onion and curry leaves. Fry till the onion turns golden brown. Add this to the vellarikka moru curry and mix well…
Vellarikka (golden cucumber) - 250 gms (measured before cleaning), cut into bute size pieces
Green chilli - 3, slit lengthwise
Turmeric powder - ½ - 1 tsp
Buttermilk / whisked yogurt - 500 ml
Coconut - ¾ cup
Cumin (jeera) - a pinch
Fenugreek seeds (uluva) - a pinch
Mustard seeds - ½ tsp
Small onion - 4, sliced
Dry red chilli - 2
Salt
Oil - I used coconut oil
Curry leaves
Instructions
Grind together coconut and cumin with ¼ cup water to a smooth paste. Add ground coconut to buttermilk or whisked yogurt and mix well.
Peel the skin and remove the seeds from vellarikka and cut into bite size pieces. Cook together vellarikka, green chilli, turmeric powder with salt and 1 cup water. Cook till the vellarikka becomes tender and water is almost dried.
Add coconut buttermilk / yogurt mixture to cooked vellarikka and mix well. Stir continuously until the steam comes through the spatula. Dont let it boil. It will take around 5-7 minutes. After removing from gas, stir for a few more minutes.
In another pan, heat oil and crackle the mustard and fenugreek seeds, add dried red chilli, sliced small onion and curry leaves. Fry till the onion turns golden brown. Add this to the vellarikka moru curry and mix well.
Serve hot with rice.
Notes
You can also make this with Kumbalanga (Ash gourd). It's better to use Buttermilk or yogurt at room temp. If you are in a hurry just keep the chilled buttermilk or a yogurt in a bowl filled with hot water and stir for sometime to remove the chillness. If you add chilled buttermilk/yogurt to the hot vellarikka mix, it might curdle.
You can store this in fridge for 2-3 days. Bring it to room temp before serving or reheat it using double boiler method, otherwise it may curdle.
Those in Gulf, can use full fat or low fat laban to make this.
Which food item comes to your mind when you think of Christmas? Is it Fruit Cake and Wine or is it something like Appam & Stew? Ok, tell me.. do you have any crunchy munchy snacks like Diamond Cuts associated with Christmas? Now, this particular snack is something which my Ammachi (maternal grandmother) used to make. Ammachi used to make sharkkara varatti (jaggery coated chips) during Onam time and this chips during Christmas time. I remember eating them out of big aluminium dhabbas (containers) during my childhood. I had it very rarely after my Ammachi passed away.
During my recent trip to Kerala, my Amma made this. She got a “vazhakkula” and made banana chips, this one and sharkkara varatti(jaggery coated chips). I should say, it was a sight to see! As I’ve said before, Amma gets into the cooking mode very rarely. When she switches onto that mode, it’s almost like a kid playing with a new toy. The excitement is always sky high! The initial plan was just to make chips. But since I was roaming around the kitchen with my camera, her excitement doubled and she got the idea of making this. Immediately, a few calls were made to her sisters to get the technical know how of it and she swung into action.
I actually felt like clicking her pictures to capture the various expressions. When these chips took it’s final shape, her face was beaming with pride, excitement and happiness. I’m not sure whether it’s the result of simple joy that cooking gives you or the joy of being able to recreate something that her mom used to make! After all food is always served with a plateful of memories on the side, right? Her excitement didnt end in the kitchen. Whoever visited our home after that, got a taste of these chips along with a generous share of her excitement :)
Well, it tasted great! She packed a small batch for Jose also and after tasting it, he didnt even allow me to touch the packet! I managed to keep aside a few, so that I can take some pictures and share it with you too. Here you go Amma, this post is for you! May the joy of cooking fill your life more often ;)
May be you can try this sugar coated chips instead of sugar cookies for a change, what say, my friend :)
Step by step pictures…
Cut the peeled plantains into oval shaped slices. Sprinkle salt and turmeric powder and give it a good shake.Heat oil in a deep pan/wok. When oil is hot enough, add the sliced plantains. Stir in between and make sure the chips arent sticking together. Fry till it turns crispy.The chips should be slightly crispier than the normal banana chips. Remove it from the oil using a slotted spoon and drain on a tissue paper.
Heat together the sugar and water in a pan. When the sugar has melted completely and the syrup has reached single thread consistency, remove from fire. Stir continuously for 2 more mins and add crushed cardamom…
Add chips to the syrup and make sure that all the pieces are coated well with the syrup. Spread out the chips in the pan itself and allow the sugar to crystallise…
Panchasara Varatti (Banana Chips Coated with Cardamom Flavoured Sugar Syrup)
Peel the plantains and soak them in water for a min or two. Pat them dry using a clean kitchen towel. Cut them into oval shaped slices. It should be slightly thicker than the normal banana chips (refer the step by step pics). Sprinkle salt and turmeric powder and give it a good shake.
Heat oil in a deep pan/wok. When oil is really hot,reduce the flame to medium-high and add the sliced plantains.You can add one slice and check whether the oil is hot enough. Make sure you dont overcrowd the pan. You can fry it in 2-3 batches, depending on the size of pan, you are using.
Stir in between and make sure the chips aren't sticking together. Once the chips are ready, it will make a specific sound, when you stir it. After hearing that sound, reduce the flame to medium and cook for a few more mins. This chips should be slightly crispier than the normal banana chips. Remove it from the oil using a slotted spoon and drain on a tissue paper. Let it cool completely.
Check out Annita's post to see a detailed version of making banana chips (http://deepann.wordpress.com/2008/08/19/vaazhakka-upperiplantain-chips/)
Powder the cardamom along with 1 tsp of sugar in a mixie.
Take a wide pan and add sugar and water. When the sugar melts completely and reaches one thread consistency (refer notes for details) remove it from fire. Keep stirring continuously for 2 more mins and add crushed cardamom powder and chips. Keep stirring it, till all the pieces are well coated with the sugar syrup. Make sure the chips aren't sticking together, separate it using a fork, if it's sticking together. Spread it out in the pan itself and let it cool. Once it's cooled completely and the sugar has crystalised, store it in an airtight container. It keeps well for 2-3 weeks.
Notes
The qty of sugar mentioned in the recipe, gives a thick sugar coating. If you prefer a thin coating of sugar, adjust the qty of sugar accordingly.
To check whether the sugar syrup has reached single thread consistency, drop the syrup in a few drops of water in a bowl. If you are able to roll the syrup into a non sticky ball, then the syrup is ready. Please check out the following link to see the detailed pics:
http://www.spiceindiaonline.com/boondi_laddu_0/
Though I've mentioned in the recipe to make sure that the chips dont stick together, it's ok even if they do.
A few weeks ago, I decided I’ll post here twice a week, instead of once. Did that for a week or two and then my computer hard disk crashed! I thought universe was supposed to conspire for me to make my decision happen, looks like universe had something else in mind rather than conspiring for my blogging frequency.
Anyways, I managed to do the Easter posts from Jose’s computer. But it didn’t work out, our working styles are different. You see, my desktop is like a crowded day at the mall, full of pictures and folders and his desktop is like a Kerala road on a hartal day! So you can imagine how it ended, I thought it was time to take a short break.
Somehow I wasn’t too keen to get my computer fixed… With the excuse of a non working computer, I was a “serial-” serial & movie watcher on Netflix and made sure that all of our internet bandwidth was used up a week before the monthly reset. Finally my eyes started hurting and my sleep was all upside down. It was time to call it quits and get my computer fixed.
Got the computer up and running the day before yesterday and Jose was a bit over excited about the whole thing. I think it had more to do with a faster internet connection, now that my binge watching had come to an end.
Have you had one of those days, when nothing works Or when you binge on something to compensate, that you feel sick of it?
So, coming to this recipe, it’s a simple and easy Payasam recipe, that you can make quickly. Since it’s made in a pressure cooker, there is not much stirring and it gets cooked fast. Hope you get to make it for Vishu.
Combine milk, water and condensed milk in a pressure cooker. Add washed ada and stir well. Bring it to a boil. Once it boils, close the cooker and put on weight. After first whistle on full flame, reduce flame to low-medium and cook for 5-6 whistles. Switch off the gas.
Keep it closed till pressure drops, 15-20 mins. Check the consistency of the payasam and also whether ada is cooked. Keep in mind that payasam tends to thicken as it rests. If the ada is not cooked well or if you want a more thicker consistency, keep cooking on low flame (without the lid) and stir in between.
Heat ghee in a pan and fry the chopped cashews till golden brown, add this to the payasam. Also add crushed cardamom. Serve hot, warm or chilled.
Notes
I added 2 tbsp of sugar, but it felt a bit too sweet for me. If you like really sweet payasam, you can add sugar.
It keeps well in the fridge for 3 days.
If you want to substitute condensed milk with sugar, I guess you need ½ - ¾ cup of sugar.
Sometimes I get comments from you saying, that you saved a call back home, since you found the recipe here. Other day, I happened to make a call back home to ask about a recipe. Sample this:
Me: Helloo
Amma: (no hello, nothing…) we were just saying you haven’t called for sometime, what news there, what are you upto these days, …
Me: huh? I just called you the other day… Amma, sorry, I’m in a hurry, I’m in the middle of making something and I want to take photos before the light goes, so tell me something, I was…
Amma: What time is it there for the sunlight to be out, is it dusty? Here it’s raining continuously and…
Me: Amma, I’m in a hurry, I’m in the middle of making something, I’m planning to make ada, so I…
Amma: Ha! Havent you made ada yet? It’s such a simple thing to make, the other day also we had Ada when…
Me: No no, I didnt get a chance to make, anyways I wanted to know how…
Amma: But that ada had banana filling, so you wont like it, I was telling…
Me: I know, ok, now please LISTEN to me, I’m in a hurry, can you…
Amma: Ayyo #$@%^&&**
Me: Hello, hello… what’s happening there? Is everything alright, are you ok?
Amma: (no response, just some raised voices in the background)
Me: Hello, hello, are you both ok? what’s happening there…
Amma: Hello, hello, you still there? haa… so what were we saying? (as if nothing happened)
Me: eh? what just happened there, are you both ok, what happ…
Amma: Why, what happened… why you are asking we are ok, we both are fine!
Me: Ok, leave it, now tell me I wanted to know about Ada, it’s…
Amma: That reminds me just the other day, I went to your site and was checking out your recipes…
Me: Ok. But now tell me this, how long…
Amma: and I was telling Appa that you never cooked anything for us, why you never make…
Me: Hello, I tried cooking for you, but it’s different from what you like and…
Amma: No no, not curries, you can make cakes for us, why aren’t you making any ..?
Me: Is there an oven for me to make cake, how am I supposed to bake cake when there is…
Amma: Your Appa wants to speak to you…
Me: Hello Appa, yes, tell me, how are things?
Appa: When you are making Idiyappam, you need to roll out the dough really thin, so that you can see the green colour of the leaves through the dough and…
Me: But I’m planning to make Ada and why…
Appa: The “thattu” (base) for Idiyappam has to be really thin, that’s how they make it in Changanacherry (his hometown) and that’s the perfect way to make it. That’s how my…
Me: (on the verge of screaming) But I’m making Ada and not Idiyappam. Why are you talking about Idiyappam now????
Appa: Ok, you talk to Amma now…
Amma: di, when did your Appa learn about cooking, he is giving you instructions…
(Phew!!! Now I know, why it’s easier to ask Google to find something, rather than making a call home ;) When was the last time you called home to ask about a recipe? Does this happen to you also?
Ok, I might have exaggerated 10% of the above conversation, but the rest is exactly how my calls back home go on! Anyways, after all that, I managed to get the details of Ada from them. Ada or Valsan as they call it, is a fav “Nalumani Palaharam” (teatime snack) of my parents. I also like it, but I only eat homemade Ada. I like to eat steamed dishes, while they’re still hot. Because once it cools down the the water residue of the steam kinda puts me off, I know it’s weird :)
Ada is another version of Kozhukatta, but the flavour from wilted banana leaves takes it to another level. You can make it two ways, by steaming or roasting on a tawa. I prefer the roasted version, the slightly charred taste from the banana leaves is another flavour altogether.
Recipe goes..
Add salt to rice flour and mix well. Add boiling water, gradually, to the rice powder and mix using a wooden spatula/spoon. Once the mixture cools down a bit, knead with your hands to make a soft and pliable dough…
Combine grated coconut and grated jaggery…
Grease the wilted leaves lightly with coconut oil or ghee. Place big lemon size balls of dough on the leaves and spread it thin using your finger tips. Make sure to dip your finger tips in water while doing this. Place some filling on one side of the rolled out dough and fold from the other side and press lightly…
Once the water starts boiling in the steamer,place the adas and cook on high flame for 8-10 mins. Open the steamer and see whether the ada is separated from the leaves, then it’s cooked…
Rice flour - ¾ - 1 cup (I used roasted rice flour)
Boiling water - 1 - 1¼ cup (refer notes)
Salt
Grated coconut - 1 cup
Grated jaggery - ⅓ cup (refer notes)
Banana leaves
Instructions
Add salt to rice flour and mix well. Add boiling water, gradually, to the rice powder and mix using a wooden spatula/spoon. Once the mixture cools down a bit, knead with your hands to make a soft and pliable dough. Cover the dough with a wet kitchen towel to prevent it from drying out.
Combine grated coconut and grated jaggery.
Clean the banana leaves with a wet towel. Place the cleaned leaves over gas flame, flip the sides in between, to wilt the leaves slightly. This will prevent the leaves from breaking while folding. It's better to use leaves without the middle stem.
Grease the wilted leaves lightly with coconut oil or ghee. Place big lemon size balls of dough on the leaves and spread it thin using your finger tips. Make sure to dip your finger tips in water while doing this.
Place some filling on one side of the rolled out dough and fold from the other side and press lightly.
Once the water starts boiling in the steamer, place the adas and cook on high flame for 8-10 mins. Open the steamer and see whether the ada is separated from the leaves, then it's cooked.
You can also cook it on Dosa pan. heat the dosa pan on medium-high heat, once the tawa is really hot, reduce flame to lowest and place the ada on tawa. Cook both sides for 3-4 mins, each
Notes
You can also add crushed cardamom to the coconut jaggery mixture. The qty of jaggery can be adjusted to suit your sweetness level. If you are steaming, make sure not to crowd the steamer with adas. If you are making large qty, steam ada in batches. Also the cooking time for ada varies depending on the thickness of adas and how much adas you've placed in the steamer. You can also use banana in the filling along with coconut and jaggery or use Chakka Varattiyathu (jackfruit preserve) as the filling.
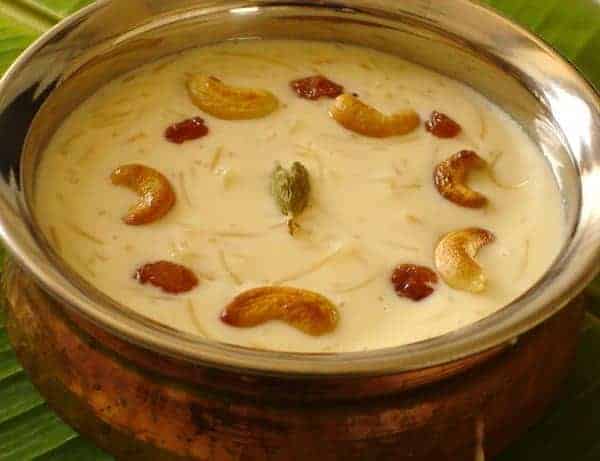


 Wish you a very happy Vishu! Hope you celebrate it with your loved ones. Hope you like our


 For more Diwali / Indian sweet recipes, click